・KVM は、ISO イメージアップロード可。
・DNS の正引き逆引き共に設定可。
(IPv6 にも IPv4 と同じ逆引きが設定されます。)
僕が借りたのは、KVM 1コア メモリ 1GB SSD 100GB のプランで、月額換算料金 550円です。
メールサーバーを建ててオリジナル・ドメインでメールアドレスを作成していますが、メールの送受信は Gmail を利用して行っています(受信は転送)。
SSL/TLS サーバー証明書は、Let’s Encrypt を利用しています。DNS-01 チャレンジで取得しました。今回はサーバー移転の際のメモ書きになります。
DNS サーバーも Web, Mail サーバーと同じマシン上で稼働している自前のものとなります。
手順は、
① 新サーバーで manual(hook なし)で初回取得
TXT を旧サーバーの DNS に手動で追加
→ 新サーバーに証明書ができる
② DNS の NS を新サーバーに切り替える
→ インターネットが新サーバーの DNS を参照
③ 新サーバーで hook 付き certbot を実行
→ TXT 自動追加
→ 認証成功
→ renewal 設定が新サーバーに作られる
→ 自動更新が成立
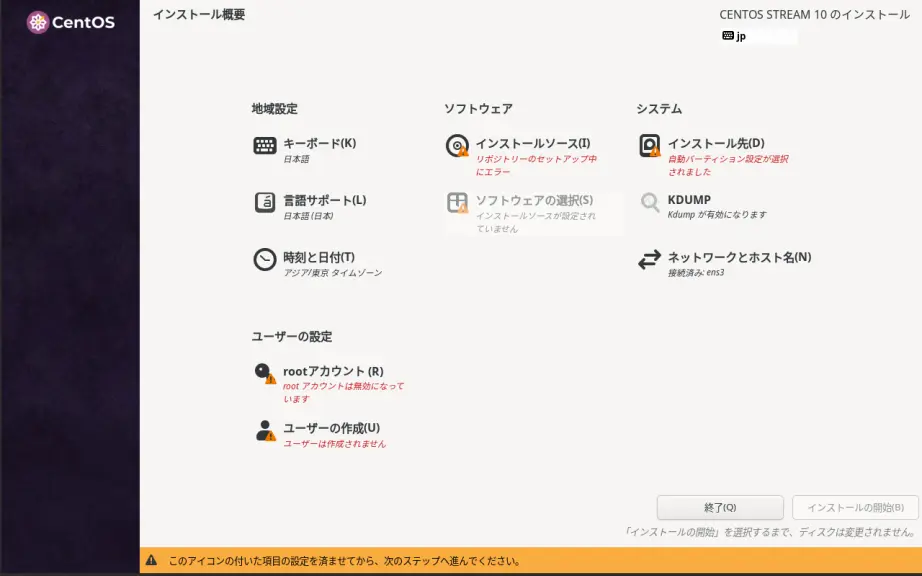
OSテンプレートを使わずにネットワークインストールをしました。
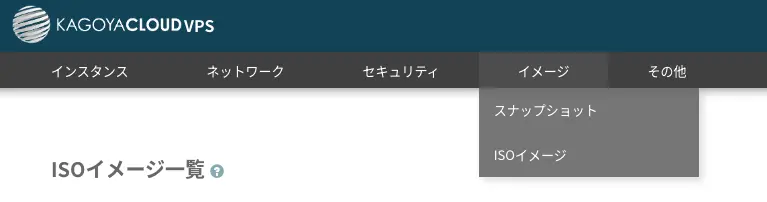
イメージ→ISOイメージで、
https://ftp.riken.jp/Linux/centos-stream/10-stream/BaseOS/x86_64/iso/CentOS-Stream-10-latest-x86_64-boot.iso
を登録し、コンソールからインストール操作です。

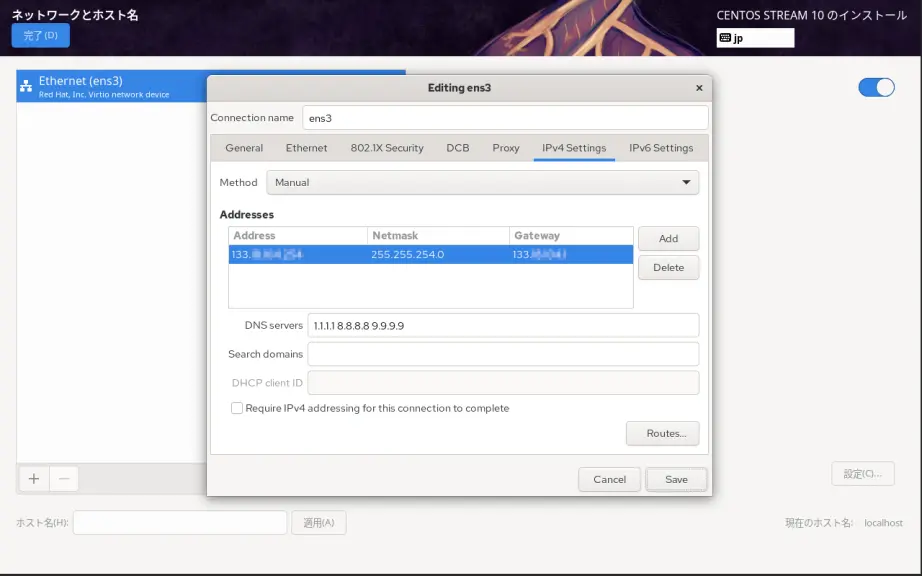
「ネットワークとホスト名(N)」が「接続済み」となっているのですが、設定が不完全なので「IPv4 Settings」をします。
「Method」を「Manual」にして、あとは「Address」「Netmask」「Gateway」「DNS servers」を提示されている情報から入力します。「DNS servers」は、Public DNS を設定しました。複数指定の場合はスペース区切りです。
「IPv6設定」はとりあえずは必要ないのでここではしていません。
その他「インストール先(D)」「rootパスワード(R)」「ユーザーの作成(U)」を設定。
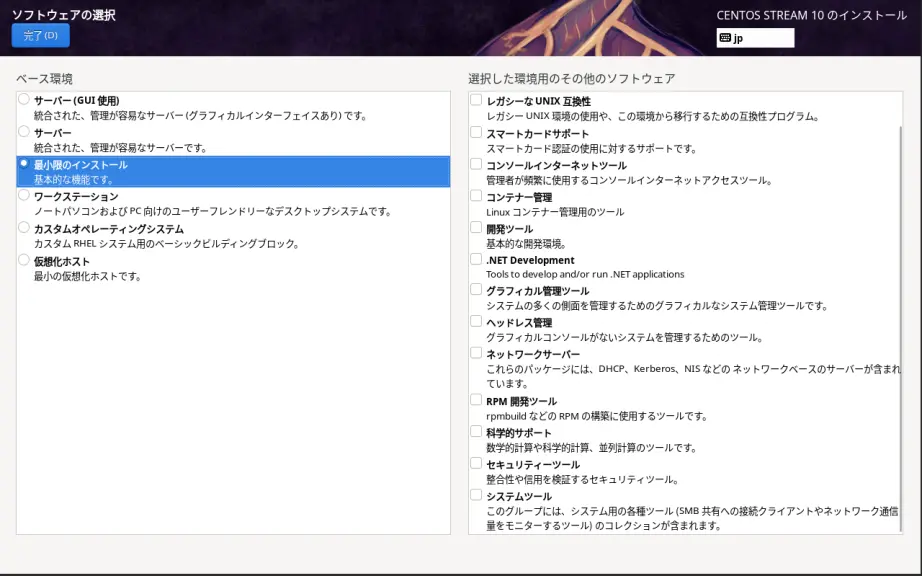
「インストールソース(I)」はその頃にはセットアップが終わっていると思うので、「ソフトウェアの選択(S)」で「最小限のインストール」を選択。
公開鍵を他サーバにアップして wget でダウンロードしたかったので、wget を使えるよう先に↓ 。
~]# dnf -y group install Base
authorized_keys をセット。
~]# cd .ssh
.ssh]# wget https://example.com/authorized_keys
.ssh]# chmod 600 authorized_keys
SSH 接続。
local:~$ ssh root@IPアドレス
SSH 設定確認
主な項目を確認。
~]# sshd -T | grep -i -E 'SyslogFacility|PermitRootLogin|PermitEmptyPasswords|PasswordAuthentication'
permitrootlogin without-password
passwordauthentication yes
permitemptypasswords no
syslogfacility AUTHPRIV
「PasswordAuthentication no」に変更しています。
~]# vi /etc/ssh/sshd_config
を編集して、sshd 再起動。
~]# systemctl restart sshd
もう一度確認。
permitrootlogin without-password
passwordauthentication no
permitemptypasswords no
syslogfacility AUTHPRIV
システムのタイムゾーンなどを確認。
~]# timedatectl
文字コードなどを確認。
~]# localectl
SELinux の無効化。
~]# setenforce 0
SELinux 設定ファイル編集。
SELINUX=disabled にする。
~]# vi /etc/sysconfig/selinux
ホスト名を変更。
~]# hostnamectl set-hostname server.wave440.com
確認。
~]# hostnamectl
端末上の表記は再ログインなどで反映されます。
以下を見ておく。
~]# cat /etc/hostname
~]# cat /etc/hosts
~]# cat /etc/resolv.conf
~]# nmcli connection show
NAME UUID TYPE DEVICE
ens3 16b6d428-fcc7-466d-9092-79b431d53a6d ethernet ens3
lo 5ea66196-0986-4c6c-bcd9-58120a6eac06 loopback lo
IPv6 の 設定をします。
~]# nmcli connection modify "ens3" ipv6.addresses "2406:xxxx:xxxx:xxxx:133:xxxx:xxxx:xxxx/64"
~]# nmcli connection modify "ens3" ipv6.gateway "2406:xxxx:xxxx:xxxx::1"
~]# nmcli connection modify "ens3" ipv6.dns "2606:4700:4700::1111 2001:4860:4860::8888 2620:fe::fe"
~]# nmcli connection modify "ens3" ipv6.method "manual"
~]# nmcli connection up "ens3"
Public DNS
1. Cloudflare(1.1.1.1 / 2606:4700:4700::1111)
2. Google(8.8.8.8 / 2001:4860:4860::8888)
3. Quad9(9.9.9.9 / 2620:fe::fe)
firewalld は、起動済み。アクティブゾーンを確認する。
~]# firewall-cmd --state
running
~]# firewall-cmd --get-active-zones
public (default)
interfaces: ens3
アクティブゾーンの恒久的なファイアウォール設定を確認。
~]# firewall-cmd --list-all --zone=public --permanent
public (default)
target: default
ingress-priority: 0
egress-priority: 0
icmp-block-inversion: no
interfaces:
sources:
services: cockpit dhcpv6-client ssh
ports:
protocols:
forward: yes
masquerade: no
forward-ports:
source-ports:
icmp-blocks:
rich rules:
EPEL のリポジトリをインストール
~]# dnf -y install epel-release
EPEL 関係、無効化。(使うときには、--enablerepo= を付ける)
~]# dnf config-manager --disable epel
有効化されているリポジトリの一覧を確認するなら。
~]# dnf repolist
有効および無効なリポジトリーの両方を一覧表示するなら。
~]# dnf repolist all
dnf アップデート
~]# dnf -y update
開発ツールパッケージ群インストール。
~]# dnf -y group install "Development Tools"
dnf-automatic インストール。
~]# dnf -y install dnf-automatic
dnf-automatic-install 自動起動有効+起動。
~]# systemctl enable --now dnf-automatic-install.timer
nkf コマンドインストール。
~]# dnf --enablerepo=epel install nkf
jq コマンドインストール。(インストール済みでした)
~]# dnf install jq
現在使用中のカーネルバージョンを確認する。
~]# uname -r
インストール済みを確認する。
~]# dnf repoquery --installonly
カーネルがアップデートされていたら再起動。
~]# reboot
postfix と s-nail をインストール。
~]# dnf -y install postfix s-nail
postfix 自動起動有効+起動。
~]# systemctl enable --now postfix
普段使っているメールアドレスに転送設定をする。(追加)
~]# vi /etc/aliases
・・・
・・・
# Person who should get root's mail
#root: marc
root: fudantukatteiru@example.com
設定反映。
~]# newaliases
テストメールを送る。
~]# echo test | mail root
※ Spamhaus の PBL(Policy Block List)に載らなくなりましたね。
PBL データベースにサーバの IP アドレスが載っているかどうかの確認は、Lookup - Reputation Checker - Spamhaus でできます。
もし、リストに載っていたら削除申請をすることになりますが、その為には逆引きが設定された静的IP であることと、該当ドメインのメールアドレスで申請する必要があるので、それらの設定およびメールサーバ構築後に行うことになります。
Chrony は起動済みでした。
~]# vi /etc/chrony.conf
変更。(追加)
# Use public servers from the pool.ntp.org project.
# Please consider joining the pool (https://www.pool.ntp.org/join.html).
#pool 2.centos.pool.ntp.org iburst
pool ntp.nict.jp iburst
再起動。
~]# systemctl restart chronyd
時刻同期状態確認。
~]# chronyc sources
perl-CPAN をインストール。
~]# dnf install perl-CPAN
入力。
~]# perl -MCPAN -e shell
CPAN.pm requires configuration, but most of it can be done automatically.
If you answer 'no' below, you will enter an interactive dialog for each
configuration option instead.
Would you like to configure as much as possible automatically? [yes] yes
Perl site library directory "/usr/local/share/perl5/5.40" does not exist.
Perl site library directory "/usr/local/share/perl5/5.40" created.
Perl site library directory "/usr/local/lib64/perl5/5.40" does not exist.
Perl site library directory "/usr/local/lib64/perl5/5.40" created.
We initialized your 'urllist' to https://cpan.org/. Type 'o conf init urllist' to change it.
Autoconfiguration complete.
commit: wrote '/root/.cpan/CPAN/MyConfig.pm'
You can re-run configuration any time with 'o conf init' in the CPAN shell
Terminal does not support AddHistory.
To fix that, maybe try> install Term::ReadLine::Perl
cpan shell -- CPAN exploration and modules installation (v2.36)
Enter 'h' for help.
cpan[1]> install MIME::Base64
cpan[2]> install CGI
cpan[3]> install Jcode
cpan[4]> quit