2024年05月
・KVM は、ISO イメージアップロード可。
・DNS の正引き逆引き共に設定可。
(IPv6 にも IPv4 と同じ逆引きが設定されます。)
僕が借りたのは、KVM 1コア メモリ 1GB SSD 25GB のプランで、月額換算料金 550円です。
メールサーバを建ててオリジナル・ドメインでメールアドレスを作成していますが、メールの送受信は Gmail を利用して行っています。また、Clam AntiVirus は、インストールしていません。
SSL/TLSサーバ証明書は、Let’s Encrypt を利用しています。旧サーバから引き継ぎ移転しました。
以下、自分用のメモ書きです。
OSテンプレートを使わずにネットワークインストールをしました。
イメージ→ISOイメージで、
https://ftp.riken.jp/Linux/centos-stream/9-stream/BaseOS/x86_64/iso/CentOS-Stream-9-latest-x86_64-boot.iso
を登録し、コンソールからインストール操作です。
「ネットワークとホスト名(N)」から「IPv4設定」をします。
「メソッド」を「手動」にして、あとは「IP」「サブネット」「ゲートウェイ」「DNS」を提示されている情報から入力します。「IPv6設定」はとりあえずは必要ないのでここではしていません。
その他「インストール先(D)」「rootパスワード(R)」「ユーザーの作成(U)」を設定。
「インストールソース(I)」はその頃にはセットアップが終わっていると思うので、「ソフトウェアの選択(S)」で「Minimal Install」を選択。
公開鍵を他サーバにアップして wget でダウンロードしたかったので、wget を使えるよう先に↓ 。
[root@v133-xxx-xxx-xxx ~]# dnf -y group install base "Development tools"
authorized_keys をセット。
[root@v133-xxx-xxx-xxx ~]# cd .ssh
[root@v133-xxx-xxx-xxx .ssh]# wget https://example.com/authorized_keys
[root@v133-xxx-xxx-xxx .ssh]# chmod 600 authorized_keys
SSH 接続。
[fedora@local ~]$ ssh root@IPアドレス
設定ファイル編集。
[root@v133-xxx-xxx-xxx ~]# vi /etc/ssh/sshd_config
以下のようにする。
SyslogFacility AUTHPRIV
PermitRootLogin without-password
PermitEmptyPasswords no
PasswordAuthentication no
sshd 再起動。
[root@v133-xxx-xxx-xxx ~]# systemctl restart sshd
システムのタイムゾーンなどを確認。
[root@v133-xxx-xxx-xxx ~]# timedatectl
文字コードなどを確認。
[root@v133-xxx-xxx-xxx ~]# localectl
SELinux の無効化。
[root@v133-xxx-xxx-xxx ~]# setenforce 0
SELinux 設定ファイル編集。
SELINUX=disabled にする。
[root@v133-xxx-xxx-xxx ~]# vi /etc/sysconfig/selinux
ホスト名を変更。
[root@v133-xxx-xxx-xxx ~]# hostnamectl set-hostname server.wave440.com
確認。
[root@v133-xxx-xxx-xxx ~]# hostnamectl
端末上の表記は再ログインなどで反映されます。
以下を見ておく。
[root@server ~]# cat /etc/hostname
[root@server ~]# cat /etc/hosts
[root@server ~]# cat /etc/resolv.conf
[root@server ~]# nmcli d
DEVICE TYPE STATE CONNECTION
ens3 ethernet 接続済み ens3
lo loopback 接続済み (外部) lo
[root@server ~]# nmcli d show ens3
IPv6 の 設定をします。
(なぜか、IPv6 のゲートウェイとサブネットの記載が見つからなかったのですが…、推測で。w)
[root@server ~]# nmcli c mod "ens3" ipv6.addresses "2406:xxxx:xxxx:xxxx:133:xxxx:xxxx:xxxx/64"
[root@server ~]# nmcli c mod "ens3" ipv6.gateway "2406:xxxx:xxxx:xxxx::1"
[root@server ~]# nmcli c mod "ens3" ipv6.dns "2606:4700:4700::1111 2606:4700:4700::1001"
[root@server ~]# nmcli c mod "ens3" ipv6.method "manual"
[root@server ~]# systemctl restart NetworkManager
参考:公開 DNS サービス
1.1.1.1 — the Internet’s Fastest, Privacy-First DNS Resolver
Google Public DNS IP addresses
firewalld は、起動済み。アクティブゾーンを確認する。
[root@server ~]# firewall-cmd --state
running
[root@server ~]# firewall-cmd --get-active-zones
public
interfaces: ens3
アクティブゾーンの恒久的なファイアウォール設定を確認。
[root@server ~]# firewall-cmd --list-all --zone=public --permanent
public
target: default
icmp-block-inversion: no
interfaces:
sources:
services: cockpit dhcpv6-client ssh
ports:
protocols:
forward: yes
masquerade: no
forward-ports:
source-ports:
icmp-blocks:
rich rules:
EPEL のリポジトリをインストール
[root@server ~]# dnf -y install epel-release
EPEL 関係、無効化。(使うときには、--enablerepo= を付ける)
[root@server ~]# dnf config-manager --disable epel
[root@server ~]# dnf config-manager --disable epel-next
[root@server ~]# dnf config-manager --disable epel-cisco-openh264
有効化されているリポジトリの一覧を確認するなら。
[root@server ~]# dnf repolist
有効および無効なリポジトリーの両方を一覧表示するなら。
[root@server ~]# dnf repolist all
dnf アップデート
[root@server ~]# dnf -y update
dnf-automatic インストール。
[root@server ~]# dnf -y install dnf-automatic
dnf-automatic-install 自動起動有効+起動。
[root@server ~]# systemctl enable --now dnf-automatic-install.timer
nkf コマンドインストール。
[root@server ~]# dnf --enablerepo=epel,epel-next install nkf
jq コマンドインストール。(インストール済みでした)
[root@server ~]# dnf install jq
現在使用中のカーネルバージョンを確認する。
[root@server ~]# uname -r
インストール済みを確認する。
[root@server ~]# dnf repoquery --installonly
カーネルがアップデートされていたら再起動。
[root@server ~]# reboot
postfix と s-nail をインストール。
[root@server ~]# dnf -y install postfix s-nail
postfix 自動起動有効+起動。
[root@server ~]# systemctl enable --now postfix
一応、root 宛ての転送設定があるか確認。
[root@server ~]# grep ^root: /etc/aliases
普段使っているメールアドレスに転送設定をする。(追加)
[root@server ~]# vi /etc/aliases
・・・
・・・
# Person who should get root's mail
#root: marc
root: fudantukatteiru@example.com
設定反映。
[root@server ~]# newaliases
テストメールを送る。
[root@server ~]# echo test|mail root
※Spamhaus の PBL(Policy Block List)を送信先のメールサーバが利用していると、受け取り拒否されると思います。
PBL データベースにサーバの IP アドレスが載っているかどうかの確認は、Lookup - Reputation Checker - Spamhaus でサーバの IP アドレスを入力して「Lookup」をクリックします。恐らく、「133.xxx.xxx.xxx has 1 listing」と表示されます。
削除申請をすることになりますが、その為には逆引きが設定された静的IP であることと、該当ドメインのメールアドレスで申請する必要があるので、それらの設定およびメールサーバ構築後に行うことになります。
【削除申請方法】
上記「133.xxx.xxx.xxx has 1 listing」と表示されたページ下の「More Info」をクリック→「I am running my own mail server」にチェックを入れ「Next Steps」ボタンをクリック→必要事項を入力して、特に問い合わせすることなどがなければ「Check this box to raise a ticket if you need more information.」にはチェックを入れないで「Submit」。
画像が古くてすみません。今回のスクショ、撮るの忘れました。
↓↓↓
↓↓↓
メールが送られて来るので、メール内のリンクをクリックして申請を完了します。
「Check this box to raise a ticket if you need more information.」にチェックを入れていなければ削除は自動処理なので、数十分で PBL から削除されます。
ただ、一度削除されても再度載ることもあるようなので定期的なチェックは必要です。
ちなみに、IPv6 アドレスについても同様の確認をしてみましたが、PBL データベースに載ってはいませんでした。
[root@server ~]# dnf install logwatch
Chrony はインストール済みでした。
[root@server ~]# vi /etc/chrony.conf
変更。(追加)
# Use public servers from the pool.ntp.org project.
# Please consider joining the pool (http://www.pool.ntp.org/join.html).
#pool 2.centos.pool.ntp.org iburst
pool ntp.nict.jp iburst
再起動。
[root@server ~]# systemctl restart chronyd
時刻同期状態確認。
[root@server ~]# chronyc sources
perl-CPAN をインストール。
[root@server ~]# dnf install perl-CPAN
入力。
[root@server ~]# perl -MCPAN -e shell
CPAN.pm requires configuration, but most of it can be done automatically.
If you answer 'no' below, you will enter an interactive dialog for each
configuration option instead.
Would you like to configure as much as possible automatically? [yes] yes
Perl site library directory "/usr/local/share/perl5" does not exist.
Perl site library directory "/usr/local/share/perl5" created.
Perl site library directory "/usr/local/lib64/perl5" does not exist.
Perl site library directory "/usr/local/lib64/perl5" created.
Autoconfiguration complete.
commit: wrote '/root/.cpan/CPAN/MyConfig.pm'
You can re-run configuration any time with 'o conf init' in the CPAN shell
Terminal does not support AddHistory.
cpan shell -- CPAN exploration and modules installation (v2.18)
Enter 'h' for help.
cpan[1]> install MIME::Base64
cpan[2]> install CGI
cpan[3]> install Jcode
cpan[4]> quit
外部向け正引きのみの 権威 DNS サーバです。
逆引きはコントロールパネルで行っています。参考:逆引き設定
bind, bind-chroot インストール。
[root@server ~]# dnf -y install bind bind-chroot
BIND 設定ファイル編集。
[root@server ~]# vi /etc/named.conf
変更と追加。
options {
#listen-on port 53 { 127.0.0.1; };
#listen-on-v6 port 53 { ::1; };
version "unknown";
directory "/var/named";
dump-file "/var/named/data/cache_dump.db";
statistics-file "/var/named/data/named_stats.txt";
memstatistics-file "/var/named/data/named_mem_stats.txt";
allow-transfer { none; };
・・・
・・・
recursion yes;
↓↓↓
recursion no;
・・・
・・・
logging {
channel default_debug {
file "data/named.run";
severity dynamic;
};
category lame-servers { null; };
};
・・・
・・・
以下を最終行へ追加。
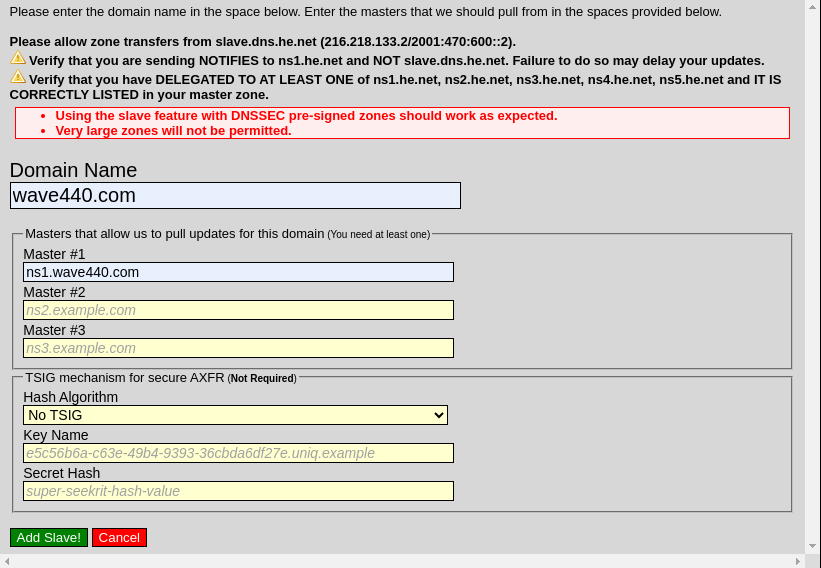
「216.218.133.2」と「2001:470:600::2」はセカンダリネームサーバ(Hurricane Electric Free DNS)の IP アドレスです。
zone "wave440.com" {
type master;
file "wave440.com.db.wan";
allow-query { any; };
allow-transfer {
216.218.133.2;
2001:470:600::2;
};
notify yes;
};
※Hurricane Electric Free DNS:サーバのIPアドレスが変わったら、旧アドレスの登録を削除して、新しく作成しなおすみたいです。自動で変わらなかったので。「Add a new slave」から → 登録画面。
外部向け正引きゾーンデータベース作成。
「ns1.he.net」~「ns5.he.net」はセカンダリネームサーバ(Hurricane Electric Free DNS)です。
[root@server ~]# vi /var/named/wave440.com.db.wan
$TTL 86400
@ IN SOA ns1.wave440.com. root.wave440.com.(
2021110201 ; Serial
7200 ; Refresh
7200 ; Retry
2419200 ; Expire
86400 ) ; Minimum
IN NS ns1.wave440.com.
IN NS ns1.he.net.
IN NS ns2.he.net.
IN NS ns3.he.net.
IN NS ns4.he.net.
IN NS ns5.he.net.
IN MX 10 wave440.com.
ns1 IN A 133.xxx.xxx.xxx
IN AAAA 2406:xxxx:xxxx:xxxx:133:xxxx:xxxx:xxxx
@ IN A 133.xxx.xxx.xxx
IN AAAA 2406:xxxx:xxxx:xxxx:133:xxxx:xxxx:xxxx
www IN A 133.xxx.xxx.xxx
IN AAAA 2406:xxxx:xxxx:xxxx:133:xxxx:xxxx:xxxx
mail IN A 133.xxx.xxx.xxx
IN AAAA 2406:xxxx:xxxx:xxxx:133:xxxx:xxxx:xxxx
server IN A 133.xxx.xxx.xxx
IN AAAA 2406:xxxx:xxxx:xxxx:133:xxxx:xxxx:xxxx
wave440.com. IN TXT "v=spf1 mx ~all"
ルートゾーン最新化。
[root@server ~]# dig . ns @198.41.0.4 +bufsize=1024 > /var/named/named.ca
ルートゾーン自動更新設定。
[root@server ~]# vi /etc/cron.monthly/named.root_update
#!/bin/bash
new=`mktemp`
errors=`mktemp`
dig . ns @198.41.0.4 +bufsize=1024 > $new 2> $errors
if [ $? -eq 0 ]; then
sort_new=`mktemp`
sort_old=`mktemp`
diff_out=`mktemp`
sort $new > $sort_new
sort /var/named/named.ca > $sort_old
diff --ignore-matching-lines=^\; $sort_new $sort_old > $diff_out
if [ $? -ne 0 ]; then
(
echo '-------------------- old named.root --------------------'
cat /var/named/named.ca
echo
echo '-------------------- new named.root --------------------'
cat $new
echo '---------------------- difference ----------------------'
cat $diff_out
) | mail -s 'named.root updated' root
cp -f $new /var/named/named.ca
chown named. /var/named/named.ca
chmod 644 /var/named/named.ca
which systemctl > /dev/null 2>&1
if [ $? -eq 0 ]; then
systemctl restart named-chroot > /dev/null
else
/etc/rc.d/init.d/named restart > /dev/null
fi
fi
rm -f $sort_new $sort_old $diff_out
else
cat $errors | mail -s 'named.root update check error' root
fi
rm -f $new $errors
ルートゾーン月次自動最新化スクリプトへ実行権限付加。
[root@server ~]# chmod 700 /etc/cron.monthly/named.root_update
named-chroot 自動起動有効+起動。
[root@server ~]# systemctl enable --now named-chroot
ポート開放。
[root@server ~]# firewall-cmd --add-service=dns --zone=public --permanent
[root@server ~]# firewall-cmd --reload
Apache と PHP 及び PHP 関連パッケージをインストール。
[root@server ~]# dnf -y install httpd php php-mbstring php-gd php-json php-xml
インストールされたモジュールの一覧を確認するなら。
[root@server ~]# php -m
Apache 設定ファイル編集。
[root@server ~]# vi /etc/httpd/conf/httpd.conf
変更と追加と削除。
ServerAdmin root@localhost
↓↓↓
ServerAdmin webmaster@wave440.com
・・・
・・・
#ServerName www.example.com:80
↓↓↓
ServerName www.wave440.com:80
・・・
・・・
<Directory "/var/www/html">
#
# Possible values for the Options directive are "None", "All",
# or any combination of:
# Indexes Includes FollowSymLinks SymLinksifOwnerMatch ExecCGI MultiViews
#
# Note that "MultiViews" must be named *explicitly* --- "Options All"
# doesn't give it to you.
#
# The Options directive is both complicated and important. Please see
# http://httpd.apache.org/docs/2.4/mod/core.html#options
# for more information.
#
Options Indexes FollowSymLinks
↓↓↓
Options Includes ExecCGI FollowSymLinks
#
# AllowOverride controls what directives may be placed in .htaccess files.
# It can be "All", "None", or any combination of the keywords:
# Options FileInfo AuthConfig Limit
#
AllowOverride None
↓↓↓
AllowOverride All
#
# Controls who can get stuff from this server.
#
Require all granted
</Directory>
・・・
・・・
<IfModule log_config_module>
#
# The following directives define some format nicknames for use with
# a CustomLog directive (see below).
#
LogFormat "%h %l %u %t \"%r\" %>s %b \"%{Referer}i\" \"%{User-Agent}i\"" combined
↓↓↓
LogFormat "%h %l %u %t \"%!414r\" %>s %b \"%{Referer}i\" \"%{User-Agent}i\"" combined
・・・
・・・
#
# If you prefer a logfile with access, agent, and referer information
# (Combined Logfile Format) you can use the following directive.
#
SetEnvIf Request_URI "default\.ida" no_log
SetEnvIf Request_URI "cmd\.exe" no_log
SetEnvIf Request_URI "root\.exe" no_log
SetEnvIf Request_URI "Admin\.dll" no_log
SetEnvIf Request_URI "NULL\.IDA" no_log
SetEnvIf Remote_Addr 127.0.0.1 no_log
CustomLog "logs/access_log" combined env=!no_log
</IfModule>
・・・
・・・
#AddHandler cgi-script .cgi .pl
・・・
・・・
# Some examples:
#ErrorDocument 500 "The server made a boo boo."
#ErrorDocument 404 /missing.html
#ErrorDocument 404 "/cgi-bin/missing_handler.pl"
#ErrorDocument 402 http://www.example.com/subscription_info.html
#
ErrorDocument 403 /error/403.shtml
ErrorDocument 404 /error/404.shtml
以下を最終行へ追加。
ServerTokens Prod
TraceEnable off
autoindex 設定ファイル編集。
[root@server ~]# vi /etc/httpd/conf.d/autoindex.conf
削除。
<Directory "/usr/share/httpd/icons">
Options Indexes MultiViews FollowSymlinks
AllowOverride None
Require all granted
</Directory>
テストページ削除。
[root@server ~]# rm -f /etc/httpd/conf.d/welcome.conf
Perl コマンドへ /usr/local/bin/perl でもアクセスできるようにする。
[root@server ~]# ln -s /usr/bin/perl /usr/local/bin/perl
Perl のパスを確認。
[root@server ~]# whereis perl
Apache 自動起動有効+起動。
[root@server ~]# systemctl enable --now httpd
ポート開放。
[root@server ~]# firewall-cmd --add-service=http --zone=public --permanent
[root@server ~]# firewall-cmd --reload
Web コンテンツ編集ユーザは、インストール時に作成したユーザとしています。(例:himari)
ドキュメントルート所有者を変更する。
[root@server ~]# chown himari: /var/www/html/
himari で SSH 鍵方式ログイン出来るようにする。
himari にスイッチする。
[root@server ~]# su - himari
[himari@server ~]$ mkdir ~/.ssh
[himari@server ~]$ chmod 700 ~/.ssh
公開鍵の中身を authorized_keys にコピペして保存。
[himari@server ~]$ vi ~/.ssh/authorized_keys
[himari@server ~]$ chmod 600 ~/.ssh/authorized_keys
[root@server ~]# vi /etc/php.ini
変更と削除と追加。
short_open_tag = Off
↓↓↓
short_open_tag = On
output_buffering = 4096
↓↓↓
output_buffering = Off
display_errors = Off
↓↓↓
display_errors = On
;date.timezone = Asia/Tokyo
;mbstring.language = Japanese
;mbstring.internal_encoding = UTF-8
;mbstring.http_input = UTF-8
;mbstring.http_output = UTF-8
;mbstring.encoding_translation = Off
↓↓↓
mbstring.encoding_translation = On
;mbstring.detect_order = auto
;mbstring.substitute_character = none
↓↓↓
mbstring.substitute_character = "?"
拡張子が php のファイルも httpd.conf の ErrorDocument で指定したオリジナルのエラーページが表示されるようにする。
[root@server ~]# vi /etc/httpd/conf.d/php.conf
追加。
<IfModule !mod_php.c>
# Enable http authorization headers
SetEnvIfNoCase ^Authorization$ "(.+)" HTTP_AUTHORIZATION=$1
<FilesMatch \.(php|phar)$>
SetHandler "proxy:unix:/run/php-fpm/www.sock|fcgi://localhost"
</FilesMatch>
ProxyErrorOverride on
</IfModule>
php-fpm 再起動。
[root@server ~]# systemctl restart php-fpm
dnf でフツウにインストールしていたら、PHP8.0 と OpenSSL3 になって、他サイトから file_get_contents などを使ってデータを取得しているページで「OpenSSL Error messages: error:0A000126:SSL routines::unexpected eof while reading」とかゆうエラーが出ます。ギャー!
なので、PHP8.2 にアップデートしました。
[root@server ~]# dnf module list php
CentOS Stream 9 - AppStream
Name Stream Profiles Summary
php 8.1 common [d], devel, minimal PHP scripting language
php 8.2 common [d], devel, minimal PHP scripting language
ヒント: [d]efault, [e]nabled, [x]disabled, [i]nstalled
[root@server ~]# dnf module enable php:8.2
[root@server ~]# dnf update php*
[root@server ~]# php -v
PHP 8.2.13 (cli) (built: Nov 21 2023 09:55:59) (NTS gcc x86_64)
Copyright (c) The PHP Group
Zend Engine v4.2.13, Copyright (c) Zend Technologies
with Zend OPcache v8.2.13, Copyright (c), by Zend Technologies
ImageMagick をインストール。
[root@server ~]# dnf --enablerepo=epel,epel-next,crb install ImageMagick ImageMagick-devel
僕は WebP への変換で cwebp, gif2webp を使っているので、libwebp-tools をインストール。
[root@server ~]# dnf --enablerepo=epel,epel-next,crb install libwebp-tools
確認。
[root@server ~]# convert --version
[root@server ~]# cwebp -version
[root@server ~]# gif2webp -version
必要なパッケージをインストール。
[root@server ~]# dnf install php-devel php-pear
pecl で imagick をインストール。
Enter
[root@server ~]# pecl install imagick
・・・
・・・
Please provide the prefix of ImageMagick installation [autodetect] : ⏎
・・・
・・・
You should add "extension=imagick.so" to php.ini
php.ini 最下部に追記。
[root@server ~]# vi /etc/php.ini
・・・
・・・
extension=imagick.so
反映。
[root@server ~]# systemctl restart php-fpm
新サーバで改めて証明書を取得するのではなく、旧サーバから新サーバに移転しました。
旧サーバで /etc/letsencrypt ディレクトリ以下を zip 圧縮して、移転先の新サーバで解凍します。
とりあえず、新サーバに Certbot クライアントをインストールします。参考:certbot instructions
まず、snapd をインストールし、自動起動有効+起動。
[root@server ~]# dnf --enablerepo=epel,epel-next install snapd
[root@server ~]# systemctl enable --now snapd.socket
シンボリックリンクを作成。
[root@server ~]# ln -s /var/lib/snapd/snap /snap
certbot をインストール。
[root@server ~]# snap install --classic certbot
シンボリックリンクを作成。
[root@server ~]# ln -s /snap/bin/certbot /usr/bin/certbot
旧サーバで /etc/letsencrypt ディレクトリ以下を zip 圧縮する。
[root@old_server ~]# cd /etc/
[root@old_server etc]# zip -ry letsencrypt.zip letsencrypt
新サーバの /etc で letsencrypt.zip を解凍する。
[root@server ~]# cd /etc/
[root@server etc]# unzip letsencrypt.zip
[root@server etc]# rm letsencrypt.zip
mod_ssl インストール。
[root@server ~]# dnf -y install mod_ssl
SSL 設定ファイル編集。
[root@server ~]# vi /etc/httpd/conf.d/ssl.conf
変更と追加。
<VirtualHost _default_:443>
Protocols h2 http/1.1
・・・
・・・
# Use separate log files for the SSL virtual host; note that LogLevel
# is not inherited from httpd.conf.
ErrorLog logs/ssl_error_log
↓↓↓
ErrorLog logs/error_log
TransferLog logs/ssl_access_log
↓↓↓
CustomLog logs/access_log combined env=!no_log
LogLevel warn
・・・
・・・
#SSLProtocol all -SSLv3
#SSLProxyProtocol all -SSLv3
SSLProtocol -all +TLSv1.2 +TLSv1.3
SSLProxyProtocol -all +TLSv1.2 +TLSv1.3
・・・
・・・
SSLCertificateFile /etc/pki/tls/certs/localhost.crt
↓↓↓
SSLCertificateFile /etc/letsencrypt/live/www.wave440.com/cert.pem
・・・
・・・
SSLCertificateKeyFile /etc/pki/tls/private/localhost.key
↓↓↓
SSLCertificateKeyFile /etc/letsencrypt/live/www.wave440.com/privkey.pem
・・・
・・・
#SSLCertificateChainFile /etc/pki/tls/certs/server-chain.crt
↓↓↓
SSLCertificateChainFile /etc/letsencrypt/live/www.wave440.com/chain.pem
・・・
・・・
Header always set Strict-Transport-Security "max-age=15768000"
</VirtualHost>
Apache 設定反映。
[root@server ~]# systemctl reload httpd
ポート開放。
[root@server ~]# firewall-cmd --add-service=https --zone=public --permanent
[root@server ~]# firewall-cmd --reload
バーチャルホスト設定ファイル作成
[root@server ~]# vi /etc/httpd/conf.d/virtualhost-www.wave440.com.conf
メールサーバ名(例:mail.wave440.com)で Web サーバ(例:www.wave440.com)へアクセスできるようにする。
<VirtualHost *:80>
ServerName www.wave440.com
ServerAlias mail.wave440.com
DocumentRoot /var/www/html
</VirtualHost>
Apache 設定反映。
[root@server ~]# systemctl reload httpd
Postfix 設定ファイル編集。
[root@server ~]# vi /etc/postfix/main.cf
変更と削除と追加。
#myhostname = host.domain.tld
#myhostname = virtual.domain.tld
myhostname = mail.wave440.com
・・・
・・・
#mydomain = domain.tld
mydomain = wave440.com
・・・
・・・
#myorigin = $myhostname
#myorigin = $mydomain
myorigin = $mydomain
・・・
・・・
#inet_interfaces = all
#inet_interfaces = $myhostname
#inet_interfaces = $myhostname, localhost
inet_interfaces = localhost
↓↓↓
inet_interfaces = all
・・・
・・・
mydestination = $myhostname, localhost.$mydomain, localhost
↓↓↓
mydestination = $myhostname, localhost.$mydomain, localhost, $mydomain
#mydestination = $myhostname, localhost.$mydomain, localhost, $mydomain
#mydestination = $myhostname, localhost.$mydomain, localhost, $mydomain,
# mail.$mydomain, www.$mydomain, ftp.$mydomain
・・・
・・・
#home_mailbox = Mailbox
#home_mailbox = Maildir/
home_mailbox = Maildir/
・・・
・・・
#smtpd_banner = $myhostname ESMTP $mail_name
#smtpd_banner = $myhostname ESMTP $mail_name ($mail_version)
smtpd_banner = $myhostname ESMTP unknown
・・・
・・・
#smtpd_tls_cert_file = /etc/pki/tls/certs/postfix.pem
・・・
・・・
#smtpd_tls_key_file = /etc/pki/tls/private/postfix.key
以下を最終行へ追加。
smtpd_sasl_auth_enable = yes
smtpd_recipient_restrictions =
permit_mynetworks
permit_sasl_authenticated
reject_unauth_destination
message_size_limit = 10485760
smtpd_tls_security_level = may
smtp_tls_mandatory_protocols = !SSLv2, !SSLv3
smtpd_tls_mandatory_protocols = !SSLv2, !SSLv3
smtpd_tls_cert_file = /etc/letsencrypt/live/mail.wave440.com/fullchain.pem
smtpd_tls_key_file = /etc/letsencrypt/live/mail.wave440.com/privkey.pem
smtpd_tls_session_cache_database = btree:/var/lib/postfix/smtpd_scache
master.cf 編集。
[root@server ~]# vi /etc/postfix/master.cf
削除。
#submission inet n - n - - smtpd
# -o syslog_name=postfix/submission
# -o smtpd_tls_security_level=encrypt
# -o smtpd_sasl_auth_enable=yes
・・・
・・・
#smtps inet n - n - - smtpd
# -o syslog_name=postfix/smtps
# -o smtpd_tls_wrappermode=yes
# -o smtpd_sasl_auth_enable=yes
cyrus-sasl インストール。
[root@server ~]# dnf -y install cyrus-sasl
自動起動有効+起動。
[root@server ~]# systemctl enable --now saslauthd
新規ユーザー追加時に自動でホームディレクトリに Maildir 形式のメールボックスが作成されるようにする。
[root@server ~]# mkdir -p /etc/skel/Maildir/{new,cur,tmp}
[root@server ~]# chmod -R 700 /etc/skel/Maildir/
存在しないユーザー宛メールの破棄。
[root@server ~]# vi /etc/postfix/main.cf
以下を最終行へ追加。
local_recipient_maps =
luser_relay = unknown_user@localhost
unknown_user 宛メールを破棄。
[root@server ~]# echo unknown_user: /dev/null >> /etc/aliases
/etc/aliases 変更反映。
[root@server ~]# newaliases
Postfix 再起動。
[root@server ~]# systemctl restart postfix
ポート開放。
[root@server ~]# firewall-cmd --add-port=25/tcp --zone=public --permanent
[root@server ~]# firewall-cmd --add-port=587/tcp --zone=public --permanent
[root@server ~]# firewall-cmd --reload
Dovecot インストール。
[root@server ~]# dnf -y install dovecot
10-mail.conf 編集。
[root@server ~]# vi /etc/dovecot/conf.d/10-mail.conf
追加。
#mail_location =
mail_location = maildir:~/Maildir
10-auth.conf 編集。
[root@server ~]# vi /etc/dovecot/conf.d/10-auth.conf
追加。
#disable_plaintext_auth = yes
disable_plaintext_auth = no
10-ssl.conf 編集。
[root@server ~]# vi /etc/dovecot/conf.d/10-ssl.conf
変更。
ssl_cert = </etc/pki/dovecot/certs/dovecot.pem
↓↓↓
ssl_cert = </etc/letsencrypt/live/mail.wave440.com/fullchain.pem
ssl_key = </etc/pki/dovecot/private/dovecot.pem
↓↓↓
ssl_key = </etc/letsencrypt/live/mail.wave440.com/privkey.pem
Dovecot 自動起動有効+起動。
[root@server ~]# systemctl enable --now dovecot
ポート開放。
[root@server ~]# firewall-cmd --add-port=995/tcp --zone=public --permanent
[root@server ~]# firewall-cmd --reload
SSH によるリモート接続はできないメールユーザ(例:rin)を作成。
[root@server ~]# useradd -s /sbin/nologin rin
[root@server ~]# passwd rin
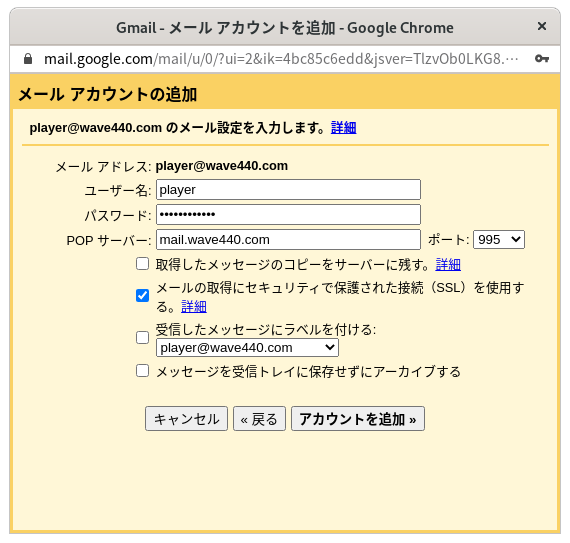
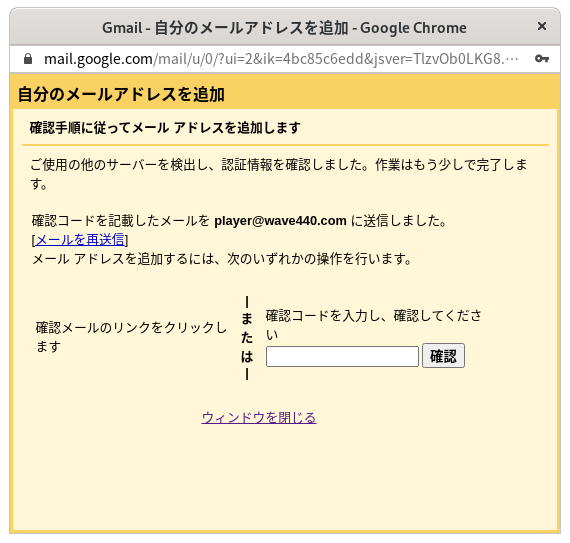
まずは、メール受信の設定から。
歯車アイコンの設定→すべての設定を表示→アカウントとインポート→メールアカウントを追加する
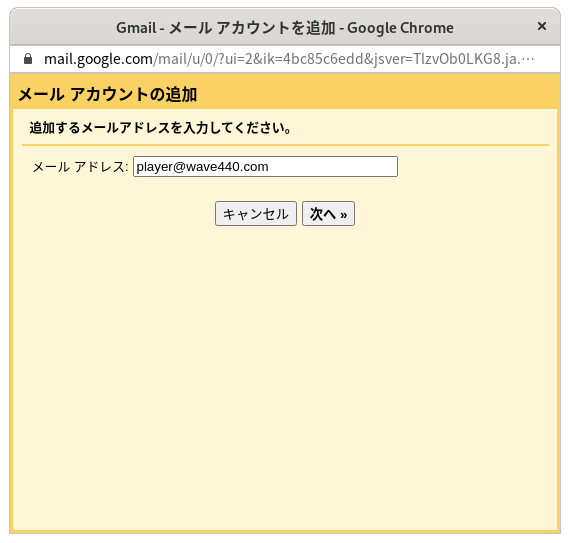
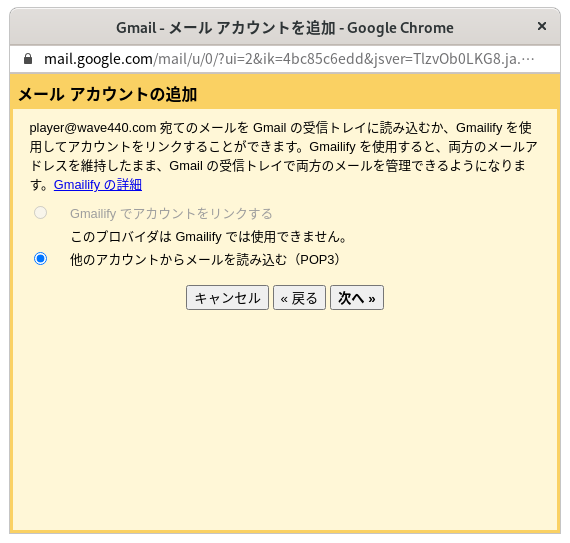
ポートは、995,SSL 使用にチェック。他のチェックボックスは、お好みで。
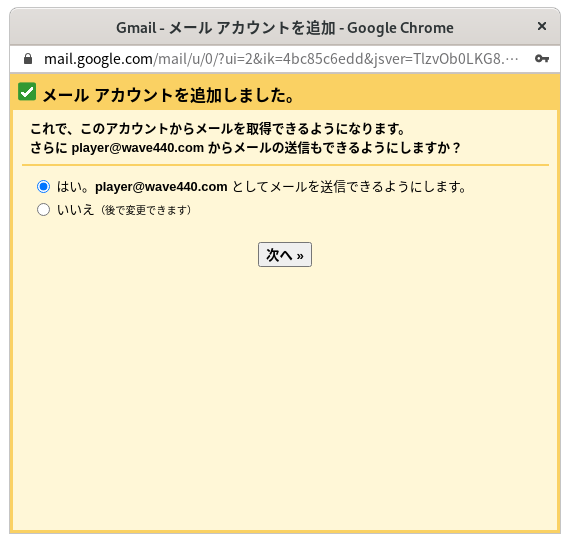
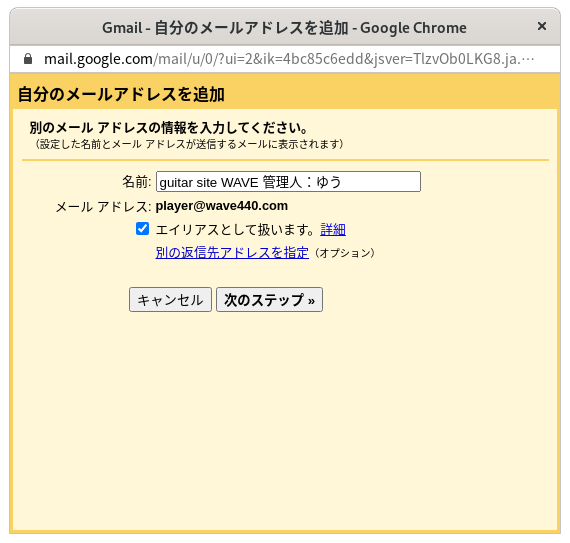
ポートは、587,TLS 使用を選択。

メール受信はすでに出来るので、以下の記載内容を実行する。
OpenDKIM インストール。
[root@server ~]# dnf --enablerepo=epel,epel-next,crb install opendkim opendkim-tools
/etc/opendkim/keys/ にキーペア(秘密鍵/公開鍵)の情報ファイルを作成。
[root@server ~]# opendkim-genkey -D /etc/opendkim/keys/ -d wave440.com
ファイルの所有権を設定。
[root@server ~]# chown opendkim: /etc/opendkim/keys/*
確認。
[root@server ~]# ls -l /etc/opendkim/keys/
合計 8
-rw------- 1 opendkim opendkim 887 4月 2 20:03 default.private
-rw------- 1 opendkim opendkim 315 4月 2 20:03 default.txt
公開鍵情報ファイルの内容を確認。
[root@server ~]# cat /etc/opendkim/keys/default.txt
default._domainkey IN TXT ( "v=DKIM1; k=rsa; "
"p=公開鍵データ" ) ; ----- DKIM key default for wave440.com
DNSサーバ(外部向け正引きゾーンデータベース)に DKIM で利用する2つのレコード(公開鍵レコードと ADSP レコード)及び DMARC レコードを登録。
[root@server ~]# vi /var/named/wave440.com.db.wan
最終行へ追加(公開鍵レコードは、上記 default.txt の内容をそのままコピペで O.K.)。
なお、外部向け正引きゾーンデータベースファイルの Serial 値も更新する。
default._domainkey IN TXT ( "v=DKIM1; k=rsa; "
"p=公開鍵データ" ) ; ----- DKIM key default for wave440.com
_adsp._domainkey.wave440.com. IN TXT "dkim=unkown"
_dmarc.wave440.com. IN TXT "v=DMARC1; p=none; rua=mailto:dmarc-rua@wave440.com"
DMARC ポリシー設定
p=<none|quarantine|reject>
ポリシーの比較
| ポリシー | 意味 | 用途の目安 |
|---|
| none | 何もしない(監視のみ) | 導入・調査フェーズ |
| quarantine | 迷惑メール扱い(隔離) | 問題が少ないと確認できた段階 |
| reject | 受信拒否 | 運用が安定し、なりすましを厳格に防ぎたい時 |
BIND 設定反映。
[root@server ~]# systemctl reload named-chroot
opendkim.conf の設定。
[root@server ~]# vi /etc/opendkim.conf
変更と追加と削除。
・・・
・・・
## Selects operating modes. Valid modes are s (sign) and v (verify). Default is v.
## Must be changed to s (sign only) or sv (sign and verify) in order to sign outgoing
## messages.
Mode v
↓↓↓
Mode sv
・・・
・・・
## Create a socket through which your MTA can communicate.
#Socket inet:8891@localhost
#Socket local:/run/opendkim/opendkim.sock
・・・
・・・
## Add a DKIM-Filter header field to messages passing through this filter
## to identify messages it has processed.
SoftwareHeader yes
↓↓↓
SoftwareHeader no
・・・
・・・
## Domain(s) whose mail should be signed by this filter. Mail from other domains will
## be verified rather than being signed. Uncomment and use your domain name.
## This parameter is not required if a SigningTable is in use.
# Domain example.com
↓↓↓
Domain wave440.com
・・・
・・・
## Identifies a set of "external" hosts that may send mail through the server as one
## of the signing domains without credentials as such.
# ExternalIgnoreList refile:/etc/opendkim/TrustedHosts
## Identifies a set "internal" hosts whose mail should be signed rather than verified.
# InternalHosts refile:/etc/opendkim/TrustedHosts
・・・
・・・
TrustedHosts ファイル確認。
[root@server ~]# cat /etc/opendkim/TrustedHosts
# OPENDKIM TRUSTED HOSTS
# To use this file, uncomment the #ExternalIgnoreList and/or the #InternalHosts
# option in /etc/opendkim.conf then restart OpenDKIM. Additional hosts
# may be added on separate lines (IP addresses, hostnames, or CIDR ranges).
# The localhost IP (127.0.0.1) should always be the first entry in this file.
127.0.0.1
::1
#host.example.com
#192.168.1.0/24
OpenDKIM の起動と自動起動設定。
[root@server ~]# systemctl enable --now opendkim
SMTP接続時にDKIMと連携するパラメータ設定を追記。
[root@server ~]# vi /etc/postfix/main.cf
最終行へ追加。
# DKIM連携の設定
smtpd_milters = inet:127.0.0.1:8891
non_smtpd_milters = inet:127.0.0.1:8891
milter_default_action = accept
Postfix 再起動。
[root@server ~]# systemctl restart postfix
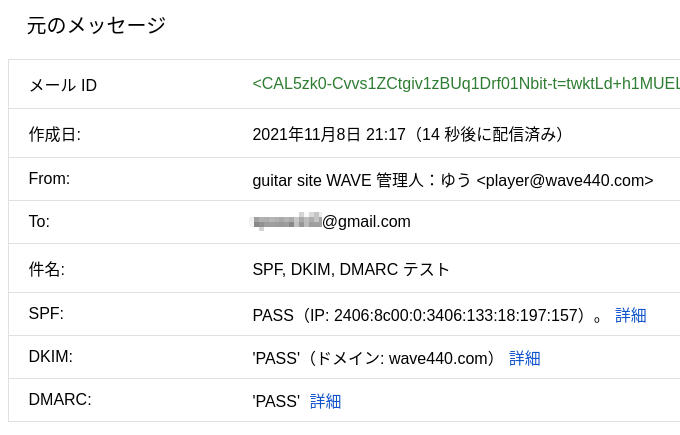
確認のため Gmail 等にメール送信してみる。
Gmail の例(メッセージのソースを表示)。
↓↓↓
Certbot パッケージには、有効期限が切れる前に証明書を自動的に更新する systemd タイマーが付属しています。
一日2回、更新が試されます。
[root@server ~]# systemctl list-timers
[root@server ~]# cat /etc/systemd/system/snap.certbot.renew.timer
post_hook の設定は、/etc/letsencrypt/renewal/ にドメイン名の .conf ファイルがあるので、その [renewalparams] セクションに追記しています。
追加。
[root@server ~]# vi /etc/letsencrypt/renewal/www.wave440.com.conf
・・・
・・・
authenticator = webroot
webroot_path = /var/www/html,
post_hook = systemctl reload httpd
・・・
・・・
[root@server ~]# vi /etc/letsencrypt/renewal/mail.wave440.com.conf
・・・
・・・
authenticator = webroot
webroot_path = /var/www/html,
post_hook = systemctl restart postfix;systemctl restart dovecot
・・・
・・・
cron で古い証明書の削除だけ行なっています。
[root@server ~]# vi /etc/cron.weekly/certbot
#!/bin/bash
find /etc/letsencrypt/archive/www.wave440.com/ -mtime +90 -delete
find /etc/letsencrypt/archive/mail.wave440.com/ -mtime +90 -delete
スクリプトへ実行権限付加。
[root@server ~]# chmod +x /etc/cron.weekly/certbot
php-mysqlnd も一緒にインストールしています。
[root@server ~]# dnf -y install mariadb-server php-mysqlnd
MariaDB 設定ファイル編集。
追加。
[root@server ~]# vi /etc/my.cnf.d/mariadb-server.cnf
# This group is only read by MariaDB-10.5 servers.
# If you use the same .cnf file for MariaDB of different versions,
# use this group for options that older servers don't understand
[mariadb-10.5]
character-set-server = utf8mb4
[root@server ~]# vi /etc/my.cnf.d/client.cnf
# This group is not read by mysql client library,
# If you use the same .cnf file for MySQL and MariaDB,
# use it for MariaDB-only client options
[client-mariadb]
default-character-set = utf8mb4
自動起動有効+起動。
[root@server ~]# systemctl enable --now mariadb
MariaDB 初期設定。
入力。
[root@server ~]# mysql_secure_installation
NOTE: RUNNING ALL PARTS OF THIS SCRIPT IS RECOMMENDED FOR ALL MariaDB
SERVERS IN PRODUCTION USE! PLEASE READ EACH STEP CAREFULLY!
In order to log into MariaDB to secure it, we'll need the current
password for the root user. If you've just installed MariaDB, and
haven't set the root password yet, you should just press enter here.
Enter current password for root (enter for none): ⏎
OK, successfully used password, moving on...
Setting the root password or using the unix_socket ensures that nobody
can log into the MariaDB root user without the proper authorisation.
You already have your root account protected, so you can safely answer 'n'.
Switch to unix_socket authentication [Y/n] n
... skipping.
You already have your root account protected, so you can safely answer 'n'.
Change the root password? [Y/n] n
... skipping.
By default, a MariaDB installation has an anonymous user, allowing anyone
to log into MariaDB without having to have a user account created for
them. This is intended only for testing, and to make the installation
go a bit smoother. You should remove them before moving into a
production environment.
Remove anonymous users? [Y/n] ⏎
... Success!
Normally, root should only be allowed to connect from 'localhost'. This
ensures that someone cannot guess at the root password from the network.
Disallow root login remotely? [Y/n] ⏎
... Success!
By default, MariaDB comes with a database named 'test' that anyone can
access. This is also intended only for testing, and should be removed
before moving into a production environment.
Remove test database and access to it? [Y/n] ⏎
- Dropping test database...
... Success!
- Removing privileges on test database...
... Success!
Reloading the privilege tables will ensure that all changes made so far
will take effect immediately.
Reload privilege tables now? [Y/n] ⏎
... Success!
Cleaning up...
All done! If you've completed all of the above steps, your MariaDB
installation should now be secure.
Thanks for using MariaDB!
【MariaDB 操作】
MariaDB へ root でログイン。(パスワード不要)
[root@server ~]# mysql
testDB データベースへの全てのアクセス権限を持った、新規ユーザー mei(パスワード:meipass )を登録。
MariaDB [(none)]> grant all privileges on testDB.* to mei@localhost identified by 'meipass';
ログアウト。
MariaDB [(none)]> exit;
Bye
MariaDB へ mei ユーザでログイン。
[root@server ~]# mysql -u mei -pmeipass
testDB データベース作成。
MariaDB [(none)]> create database testDB;
testDB データベースへ接続。
MariaDB [(none)]> use testDB;
testTB テーブル作成。
MariaDB [testDB]> create table testTB(num int, name varchar(50));
・作成確認
mei ユーザ登録確認。
MariaDB [(none)]> select user from mysql.user where user='mei';
データベース作成確認。
MariaDB [(none)]> show databases;
テーブル作成確認。
MariaDB [testDB]> show tables;
カラム確認。
MariaDB [testDB]> show columns from testTB;
データ内容確認。select * from テーブル名;
MariaDB [testDB]> select * from testTB;
・削除
testTB テーブル内データ削除。delete from テーブル名 where カラム名="値";
MariaDB [testDB]> delete from testTB where num=1;
testTB テーブル削除。
MariaDB [testDB]> drop table testTB;
testDB データベース削除。
MariaDB [testDB]> drop database testDB;
mei ユーザから全てのデータベースへのアクセス権限を剥奪し、ユーザ削除。
[root@server ~]# mysql -u root -p
Enter password:
・・・
・・・
MariaDB [(none)]> revoke all privileges on *.* from mei@localhost;
MariaDB [(none)]> delete from mysql.user where user='mei' and host='localhost';
MariaDB [(none)]> flush privileges;
【その他】
PRIMARY KEY と AUTOINCREMENT を設定したカラムを追加する。
MariaDB [testDB]> alter table testTB add id int not null primary key auto_increment;
【データのバックアップ及びリストア】
ダンプファイル名:testDBsql.dmp
[root@server ~]# mysqldump -u mei -pmeipass testDB > testDBsql.dmp
[root@server ~]# mysql -u mei -pmeipass testDB < testDBsql.dmp
rclone インストール。
[root@server ~]# curl https://rclone.org/install.sh | bash
・・・
・・・
rclone v1.66.0 has successfully installed.
Now run "rclone config" for setup. Check https://rclone.org/docs/ for more details.
ローカルの PC で rclone コマンドを使用するため、ローカルの PC にも rclone のインストールが必要。
[fedora@local ~]$ sudo -v ; curl https://rclone.org/install.sh | sudo bash
リモート設定を登録。入力,コメント。
client_id,client_secret は、作成せずに空エンターでも可ですが、パフォーマンスが落ちるとのこと。
作成するのであれば、ご参考まで。→
rclone 用に独自の Google Drive クライアント ID を作成する。
[root@server ~]# rclone config
2024/05/26 15:12:09 NOTICE: Config file "/root/.config/rclone/rclone.conf" not found - using defaults
No remotes found, make a new one?
n) New remote
s) Set configuration password
q) Quit config
n/s/q> n
Enter name for new remote.
name> google-backup ← 任意のリモート設定名
Option Storage.
Type of storage to configure.
Choose a number from below, or type in your own value.
1 / 1Fichier
\ (fichier)
2 / Akamai NetStorage
\ (netstorage)
3 / Alias for an existing remote
\ (alias)
4 / Amazon S3 Compliant Storage Providers including AWS, Alibaba, ArvanCloud, Ceph, ChinaMobile, Cloudflare, DigitalOcean, Dreamhost, GCS, HuaweiOBS, IBMCOS, IDrive, IONOS, LyveCloud, Leviia, Liara, Linode, Minio, Netease, Petabox, RackCorp, Rclone, Scaleway, SeaweedFS, StackPath, Storj, Synology, TencentCOS, Wasabi, Qiniu and others
\ (s3)
5 / Backblaze B2
\ (b2)
6 / Better checksums for other remotes
\ (hasher)
7 / Box
\ (box)
8 / Cache a remote
\ (cache)
9 / Citrix Sharefile
\ (sharefile)
10 / Combine several remotes into one
\ (combine)
11 / Compress a remote
\ (compress)
12 / Dropbox
\ (dropbox)
13 / Encrypt/Decrypt a remote
\ (crypt)
14 / Enterprise File Fabric
\ (filefabric)
15 / FTP
\ (ftp)
16 / Google Cloud Storage (this is not Google Drive)
\ (google cloud storage)
17 / Google Drive
\ (drive)
18 / Google Photos
\ (google photos)
19 / HTTP
\ (http)
20 / Hadoop distributed file system
\ (hdfs)
21 / HiDrive
\ (hidrive)
22 / ImageKit.io
\ (imagekit)
23 / In memory object storage system.
\ (memory)
24 / Internet Archive
\ (internetarchive)
25 / Jottacloud
\ (jottacloud)
26 / Koofr, Digi Storage and other Koofr-compatible storage providers
\ (koofr)
27 / Linkbox
\ (linkbox)
28 / Local Disk
\ (local)
29 / Mail.ru Cloud
\ (mailru)
30 / Mega
\ (mega)
31 / Microsoft Azure Blob Storage
\ (azureblob)
32 / Microsoft Azure Files
\ (azurefiles)
33 / Microsoft OneDrive
\ (onedrive)
34 / OpenDrive
\ (opendrive)
35 / OpenStack Swift (Rackspace Cloud Files, Blomp Cloud Storage, Memset Memstore, OVH)
\ (swift)
36 / Oracle Cloud Infrastructure Object Storage
\ (oracleobjectstorage)
37 / Pcloud
\ (pcloud)
38 / PikPak
\ (pikpak)
39 / Proton Drive
\ (protondrive)
40 / Put.io
\ (putio)
41 / QingCloud Object Storage
\ (qingstor)
42 / Quatrix by Maytech
\ (quatrix)
43 / SMB / CIFS
\ (smb)
44 / SSH/SFTP
\ (sftp)
45 / Sia Decentralized Cloud
\ (sia)
46 / Storj Decentralized Cloud Storage
\ (storj)
47 / Sugarsync
\ (sugarsync)
48 / Transparently chunk/split large files
\ (chunker)
49 / Union merges the contents of several upstream fs
\ (union)
50 / Uptobox
\ (uptobox)
51 / WebDAV
\ (webdav)
52 / Yandex Disk
\ (yandex)
53 / Zoho
\ (zoho)
54 / premiumize.me
\ (premiumizeme)
55 / seafile
\ (seafile)
Storage> drive
Option client_id.
Google Application Client Id
Setting your own is recommended.
See https://rclone.org/drive/#making-your-own-client-id for how to create your own.
If you leave this blank, it will use an internal key which is low performance.
Enter a value. Press Enter to leave empty.
client_id> ⏎ ← 作成していればクライアント ID を入力
Option client_secret.
OAuth Client Secret.
Leave blank normally.
Enter a value. Press Enter to leave empty.
client_secret> ⏎ ← 作成していればクライアント シークレットを入力
Option scope.
Comma separated list of scopes that rclone should use when requesting access from drive.
Choose a number from below, or type in your own value.
Press Enter to leave empty.
1 / Full access all files, excluding Application Data Folder.
\ (drive)
2 / Read-only access to file metadata and file contents.
\ (drive.readonly)
/ Access to files created by rclone only.
3 | These are visible in the drive website.
| File authorization is revoked when the user deauthorizes the app.
\ (drive.file)
/ Allows read and write access to the Application Data folder.
4 | This is not visible in the drive website.
\ (drive.appfolder)
/ Allows read-only access to file metadata but
5 | does not allow any access to read or download file content.
\ (drive.metadata.readonly)
scope> 1
Option service_account_file.
Service Account Credentials JSON file path.
Leave blank normally.
Needed only if you want use SA instead of interactive login.
Leading `~` will be expanded in the file name as will environment variables such as `${RCLONE_CONFIG_DIR}`.
Enter a value. Press Enter to leave empty.
service_account_file> ⏎
Edit advanced config?
y) Yes
n) No (default)
y/n> n
Use web browser to automatically authenticate rclone with remote?
* Say Y if the machine running rclone has a web browser you can use
* Say N if running rclone on a (remote) machine without web browser access
If not sure try Y. If Y failed, try N.
y) Yes (default)
n) No
y/n> n
Option config_token.
For this to work, you will need rclone available on a machine that has
a web browser available.
For more help and alternate methods see: https://rclone.org/remote_setup/
Execute the following on the machine with the web browser (same rclone
version recommended):
rclone authorize "drive" "eyJjbxxxxx" ← ※1
Then paste the result.
Enter a value.
config_token> ← ※2
Configure this as a Shared Drive (Team Drive)?
y) Yes
n) No (default)
y/n> n
Configuration complete.
Options:
- type: drive
- client_id: 43xxxxx-ofxxxxx.apps.googleusercontent.com
- client_secret: gYxxxxx
- scope: drive
- token: {"access_token":"ya29.xxxxx","expiry":"2024-05-26T16:37:54.801531988+09:00"}
- team_drive:
Keep this "google-backup" remote?
y) Yes this is OK (default)
e) Edit this remote
d) Delete this remote
y/e/d> y
Current remotes:
Name Type
==== ====
google-backup drive
e) Edit existing remote
n) New remote
d) Delete remote
r) Rename remote
c) Copy remote
s) Set configuration password
q) Quit config
e/n/d/r/c/s/q> q
※1 ローカルの PC でココのコマンドを実行する。
[fedora@local ~]$ rclone authorize "drive" "eyJjbxxxxx"
・・・
・・・
ブラウザが立ち上がり Google のログイン画面となるので、ログイン。
警告のようなものは「詳細」から「rclone(安全ではないページ)に移動」で進む。
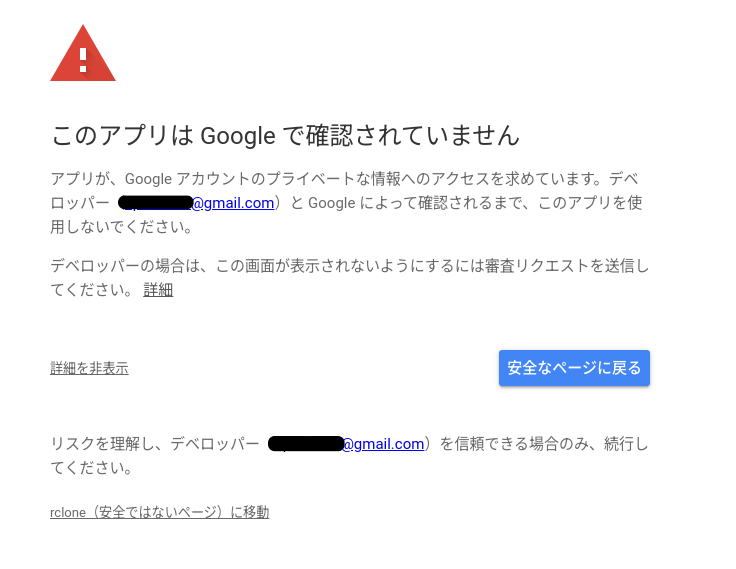
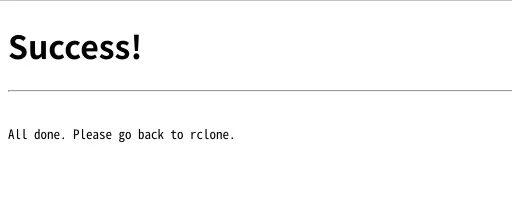
最終的には「Success!」と表示されて、端末上には以下のようにトークンが表示されているので、それを※2にコピペ。
・・・
・・・
Paste the following into your remote machine --->
eyJ0bxxxxx
<---End paste
【Rclone 基本操作】
BACKUP ディレクトリを作成。
[root@server ~]# rclone mkdir google-backup:/BACKUP
確認。
[root@server ~]# rclone lsd google-backup:
-1 2020-11-28 12:55:06 -1 BACKUP
コピーしてバックアップをとる。
(-P/--progress:リアルタイムの転送統計を表示する)
[root@server ~]# rclone copy /path/to/dir/website.tar google-backup:/BACKUP/ -P
Transferred: 2.407M / 2.407 MBytes, 100%, 264.357 kBytes/s, ETA 0s
Transferred: 1 / 1, 100%
Elapsed time: 9.9s
確認。
[root@server ~]# rclone ls google-backup:/BACKUP/
2524097 website.tar
- guitar site WAVE -