php-mysqlnd も一緒にインストールしています。
~]# dnf -y install mariadb-server php-mysqlnd
MariaDB 設定ファイル編集。
追加。
~]# vi /etc/my.cnf.d/mariadb-server.cnf
# This group is only read by MariaDB-10.11 servers.
# If you use the same .cnf file for MariaDB of different versions,
# use this group for options that older servers don't understand
[mariadb-10.11]
character-set-server = utf8mb4
~]# vi /etc/my.cnf.d/client.cnf
# This group is not read by mysql client library,
# If you use the same .cnf file for MySQL and MariaDB,
# use it for MariaDB-only client options
[client-mariadb]
default-character-set = utf8mb4
自動起動有効+起動。
~]# systemctl enable --now mariadb
MariaDB 初期設定。
~]# mysql_secure_installation
入力。
NOTE: RUNNING ALL PARTS OF THIS SCRIPT IS RECOMMENDED FOR ALL MariaDB
SERVERS IN PRODUCTION USE! PLEASE READ EACH STEP CAREFULLY!
In order to log into MariaDB to secure it, we'll need the current
password for the root user. If you've just installed MariaDB, and
haven't set the root password yet, you should just press enter here.
Enter current password for root (enter for none): ⏎
OK, successfully used password, moving on...
Setting the root password or using the unix_socket ensures that nobody
can log into the MariaDB root user without the proper authorisation.
You already have your root account protected, so you can safely answer 'n'.
Switch to unix_socket authentication [Y/n] n
... skipping.
You already have your root account protected, so you can safely answer 'n'.
Change the root password? [Y/n] n
... skipping.
By default, a MariaDB installation has an anonymous user, allowing anyone
to log into MariaDB without having to have a user account created for
them. This is intended only for testing, and to make the installation
go a bit smoother. You should remove them before moving into a
production environment.
Remove anonymous users? [Y/n] ⏎
... Success!
Normally, root should only be allowed to connect from 'localhost'. This
ensures that someone cannot guess at the root password from the network.
Disallow root login remotely? [Y/n] ⏎
... Success!
By default, MariaDB comes with a database named 'test' that anyone can
access. This is also intended only for testing, and should be removed
before moving into a production environment.
Remove test database and access to it? [Y/n] ⏎
- Dropping test database...
... Success!
- Removing privileges on test database...
... Success!
Reloading the privilege tables will ensure that all changes made so far
will take effect immediately.
Reload privilege tables now? [Y/n] ⏎
... Success!
Cleaning up...
All done! If you've completed all of the above steps, your MariaDB
installation should now be secure.
Thanks for using MariaDB!
MariaDB へ root でログイン。(パスワード不要)
~]# mysql
【以降の作業について。】
① root で DB を作る(管理者作業)
MariaDB [(none)]> CREATE DATABASE app_db;
② root でユーザーを作る(管理者作業)
MariaDB [(none)]> CREATE USER 'app_user'@'localhost' IDENTIFIED BY 'password';
③ 必要最小限の権限だけ与える
MariaDB [(none)]> GRANT SELECT, UPDATE, DELETE ON app_db.* TO 'app_user'@'localhost';
④ アプリはそのユーザーで DB に接続する
下記は root だけがやればよい。
DB 作成
テーブル作成
ユーザー作成
権限管理
バックアップ
リストア
GRANT と REVOKE
GRANT は 上書きではなく追加
権限を減らしたいときは REVOKE が必須
app_user から UPDATE だけ削除したい場合:
MariaDB [(none)]> REVOKE UPDATE ON app_db.* FROM 'app_user'@'localhost';
付与可能なすべての権限を追加する
MariaDB [(none)]> GRANT ALL PRIVILEGES ON db.* TO 'user'@'host';
そのユーザーが持っている権限をすべて削除する
MariaDB [(none)]> REVOKE ALL PRIVILEGES ON db.* FROM 'user'@'host';
app_user の権限を確認する
MariaDB [(none)]> SHOW GRANTS FOR 'app_user'@'localhost';
データのバックアップ及びリストア
~]# mysqldump auth_db > auth_db.sql
~]# mysql auth_db < auth_db.sql
データベース一覧を表示する
MariaDB [(none)]> SHOW DATABASES;
ユーザー一覧を表示する
MariaDB [(none)]> SELECT User, Host FROM mysql.user;
全ユーザーの権限をまとめて標準出力
~]# mysql -N -e "SELECT CONCAT('SHOW GRANTS FOR ''',User,'''@''',Host,''';') FROM mysql.user" \
| mysql
【受信】
受信は自動転送にしています。
「root 宛てメールの転送」の要領で。
アカウント名(例:player)を Gmail へ転送。
~]# vi /etc/aliases
追加。
player: tensousaki@gmail.com
設定反映。
~]# newaliases
【送信】
送信専用に Roundcube をインストールしました。
【返信】
返信の場合は下記のような手間がかかります。
Gmail で受信メールを読む
↓
必要なメールだけ .eml として保存
↓
Roundcube にインポート
↓
Roundcube で返信
《 Roundcube をインストール 》
必要パッケージのインストール。(ほとんどインストール済みですが)
~]# dnf install httpd mariadb-server php php-fpm php-mysqlnd php-mbstring php-xml php-gd php-intl php-zip php-pdo php-json wget tar php-cli php-opcache php-fileinfo
Roundcube 用データベース作成
~]# mysql
MariaDB [(none)]> CREATE DATABASE roundcubemail CHARACTER SET utf8mb4 COLLATE utf8mb4_unicode_ci;
MariaDB [(none)]> CREATE USER 'roundcube'@'localhost' IDENTIFIED BY 'your_strong_password';
MariaDB [(none)]> GRANT ALL PRIVILEGES ON roundcubemail.* TO 'roundcube'@'localhost';
MariaDB [(none)]> FLUSH PRIVILEGES;
MariaDB [(none)]> EXIT;
最新版(Complete版)の確認
~]# cd /tmp
tmp]# wget https://github.com/roundcube/roundcubemail/releases/download/1.7.3/roundcubemail-1.7.3-complete.tar.gz
解凍と配置
tmp]# tar -xvf roundcubemail-1.7.3-complete.tar.gz
tmp]# mv roundcubemail-1.7.3 /var/www/roundcube
データベースの初期スキーマをインポート
tmp]# mariadb -u roundcube -p roundcubemail < /var/www/roundcube/SQL/mysql.initial.sql
所有者変更
tmp]# chown -R apache:apache /var/www/roundcube
tmp]# chmod -R 755 /var/www/roundcube
サンプル設定をコピーし、設定ファイルを作成・編集します。
tmp]# cd /var/www/roundcube/config && cp config.inc.php.sample config.inc.php
~]# vi /var/www/roundcube/config/config.inc.php
変更と追加
・・・
・・・
$config['db_dsnw'] = 'mysql://roundcube:pass@localhost/roundcubemail';
↓↓↓
$config['db_dsnw'] = 'mysql://roundcube:your_strong_password@localhost/roundcubemail';
・・・
・・・
$config['imap_host'] = 'localhost:143';
↓↓↓
$config['imap_host'] = '127.0.0.1:143';
// 接続オプション(TLS を無効化して接続)
$config['imap_conn_options'] = [
'ssl' => [
'verify_peer' => false,
'verify_peer_name' => false,
],
];
・・・
・・・
$config['smtp_host'] = 'localhost:587';
↓↓↓
$config['smtp_host'] = '127.0.0.1:25';
// TLS を明示的に無効化し、証明書検証エラーを回避
$config['smtp_conn_options'] = [
'ssl' => [
'verify_peer' => false,
'verify_peer_name' => false,
],
];
・・・
・・・
$config['des_key'] = 'rcmail-!24ByteDESkey*Str';
↓↓↓
$config['des_key'] = '半角24文字';
・・・
・・・
// 送信元のデフォルトドメイン指定(@127.0.0.1 から @wave440.com へ変更)
$config['mail_domain'] = 'wave440.com';
パスワード部分(your_strong_password)をシングルクオートなどで囲んではいけません。
パスワードに特殊文字(記号)が含まれる場合、URL エンコード(パーセントエンコーディング) を行う必要があります。
パスワードに英数字以外の記号が含まれていて「エンコードが必要かどうかわからない」と迷った場合は、すべての記号を URL エンコードしておくのが最も安全です。
Bash :
# 例: 'my=pass@word#' をエンコードする場合
php -r "echo urlencode('my=pass@word#') . \"\n\";"
# 出力結果: my%3Dpass%40word%23
$config['des_key']
Roundcube のデフォルトの暗号化方式では、des_key は厳密に「半角24文字」で指定する必要があります。
安全な 24 文字キーの生成方法 :
openssl rand -base64 24 | cut -c 1-24
英数字のみで記号が入りませんが問題ありません。
des_key に必要な条件は、「暗号化用鍵として十分な長さ(24バイト/24文字)があり、第三者に推測されないランダムな文字列であること」です。記号の含有は必須要件ではありません。
VirtualHost の設定
Roundcube をサブディレクトリ (Alias) 方式ではなく、サブドメイン方式(mail.wave440.com) で動かしています。
~]# vi /etc/httpd/conf.d/roundcube.conf
<VirtualHost *:443>
ServerName mail.wave440.com
# Roundcube の公開ディレクトリ
DocumentRoot /var/www/roundcube/public_html
# Roundcube が .htaccess を使うため必須
<Directory /var/www/roundcube/public_html>
AllowOverride All
Require all granted
</Directory>
# SSL(ワイルドカード証明書)
SSLEngine on
SSLCertificateFile /etc/letsencrypt/live/wave440.com/fullchain.pem
SSLCertificateKeyFile /etc/letsencrypt/live/wave440.com/privkey.pem
# ログ(分離推奨)
ErrorLog /var/log/httpd/roundcube_ssl_error.log
CustomLog /var/log/httpd/roundcube_ssl_access.log combined
</VirtualHost>
Apache 再起動
~]# apachectl configtest
~]# systemctl restart php-fpm
~]# systemctl restart httpd
インストーラーディレクトリの削除(セキュリティ保護)
~]# rm -rf /var/www/roundcube/installer
Web メール(Roundcube)のみで運用し、メールソフトなど外部からの直接の IMAP 接続はしないので、143, 587, 993 のポートは閉じています。25 のポートは、外部のメールサーバーからメールを受信するため開けています。
~]# firewall-cmd --remove-port=587/tcp --zone=public --permanent
~]# firewall-cmd --remove-port=993/tcp --zone=public --permanent
~]# firewall-cmd --reload
アップデートについて。
Roundcube には付属の安全な更新用スクリプトが用意されています。
新しいバージョンの Complete 版を解凍後、以下を実行するだけで設定・DBを保持したまま更新可能です。
~]# /path/to/new_roundcube/bin/installto.sh /var/www/roundcube
rclone インストール。
~]# curl https://rclone.org/install.sh | bash
・・・
・・・
rclone v1.74.3 has successfully installed.
Now run "rclone config" for setup. Check https://rclone.org/docs/ for more details.
ローカルの PC で rclone コマンドを使用するため、ローカルの PC にも rclone のインストールが必要。
local:~$ sudo -v ; curl https://rclone.org/install.sh | sudo bash
リモート設定を登録。入力,コメント。
client_id,client_secret は、作成せずに空エンターでも可ですが、パフォーマンスが落ちるとのこと。
作成するのであれば、ご参考まで。→ rclone 用に独自の Google Drive クライアント ID を作成する。
~]# rclone config
2026/06/06 12:05:13 NOTICE: Config file "/root/.config/rclone/rclone.conf" not found - using defaults
No remotes found, make a new one?
n) New remote
s) Set configuration password
q) Quit config
n/s/q> n
Enter name for new remote.
name> google-backup ← 任意のリモート設定名
Option Storage.
Type of storage to configure.
Choose a number from below, or type in your own value.
1 / 1Fichier
\ (fichier)
2 / Akamai NetStorage
\ (netstorage)
3 / Alias for an existing remote
\ (alias)
・・・
・・・
23 / Google Cloud Storage (this is not Google Drive)
\ (google cloud storage)
24 / Google Drive
\ (drive)
25 / Google Photos
\ (google photos)
・・・
・・・
66 / iCloud Drive and Photos
\ (iclouddrive)
67 / premiumize.me
\ (premiumizeme)
68 / seafile
\ (seafile)
Storage> drive
Option client_id.
Google Application Client Id
Setting your own is recommended.
See https://rclone.org/drive/#making-your-own-client-id for how to create your own.
If you leave this blank, it will use an internal key which is low performance.
Enter a value. Press Enter to leave empty.
client_id> ⏎ ← 作成していればクライアント ID を入力
Option client_secret.
OAuth Client Secret.
Leave blank normally.
Enter a value. Press Enter to leave empty.
client_secret> ⏎ ← 作成していればクライアント シークレットを入力
Option scope.
Comma separated list of scopes that rclone should use when requesting access from drive.
Choose a number from below, or type in your own value.
Press Enter to leave empty.
1 / Full access all files, excluding Application Data Folder.
\ (drive)
2 / Read-only access to file metadata and file contents.
\ (drive.readonly)
/ Access to files created by rclone only.
3 | These are visible in the drive website.
| File authorization is revoked when the user deauthorizes the app.
\ (drive.file)
/ Allows read and write access to the Application Data folder.
4 | This is not visible in the drive website.
\ (drive.appfolder)
/ Allows read-only access to file metadata but
5 | does not allow any access to read or download file content.
\ (drive.metadata.readonly)
scope> 1
Option service_account_file.
Service Account Credentials JSON file path.
Leave blank normally.
Needed only if you want use SA instead of interactive login.
Leading `~` will be expanded in the file name as will environment variables such as `${RCLONE_CONFIG_DIR}`.
Enter a value. Press Enter to leave empty.
service_account_file> ⏎
Edit advanced config?
y) Yes
n) No (default)
y/n> n
Use web browser to automatically authenticate rclone with remote?
* Say Y if the machine running rclone has a web browser you can use
* Say N if running rclone on a (remote) machine without web browser access
If not sure try Y. If Y failed, try N.
y) Yes (default)
n) No
y/n> n
Option config_token.
For this to work, you will need rclone available on a machine that has
a web browser available.
For more help and alternate methods see: https://rclone.org/remote_setup/
Execute the following on the machine with the web browser (same rclone
version recommended):
rclone authorize "drive" "eyJjbxxxxx" ← ※1
Then paste the result.
Enter a value.
config_token> ← ※2
Configure this as a Shared Drive (Team Drive)?
y) Yes
n) No (default)
y/n> n
Configuration complete.
Options:
- type: drive
- scope: drive
- token: {"access_token":"ya29.xxxxx","expiry":"2026-06-06T13:16:10.992982584+09:00","expires_in":3599}
- team_drive:
Keep this "google-backup" remote?
y) Yes this is OK (default)
e) Edit this remote
d) Delete this remote
y/e/d> y
Current remotes:
Name Type
==== ====
google-backup drive
e) Edit existing remote
n) New remote
d) Delete remote
r) Rename remote
c) Copy remote
s) Set configuration password
q) Quit config
e/n/d/r/c/s/q> q
※1 ローカルの PC でココのコマンドを実行する。
local:~$ rclone authorize "drive" "eyJjbxxxxx"
・・・
・・・
ブラウザが立ち上がり Google のログイン画面となるので、ログイン。続行。
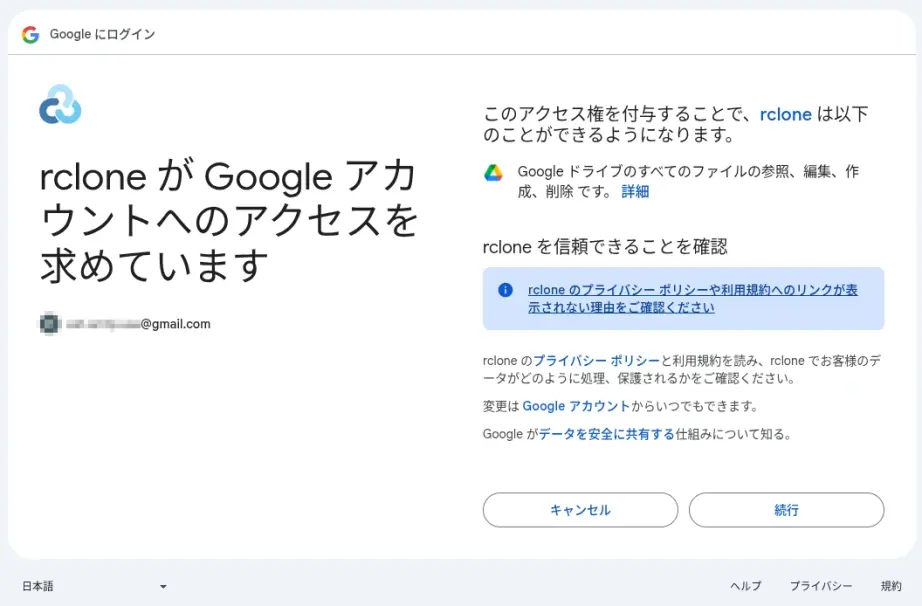
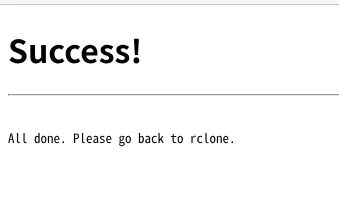
最終的には「Success!」と表示されて、端末上には以下のようにトークンが表示されているので、それを※2にコピペ。
・・・
・・・
Paste the following into your remote machine --->
eyJ0bxxxxx
<---End paste
【Rclone 基本操作】
BACKUP ディレクトリを作成。
~]# rclone mkdir google-backup:/BACKUP
確認。
~]# rclone lsd google-backup:
-1 2020-11-28 12:55:06 -1 BACKUP
コピーしてバックアップをとる。
(-P/--progress:リアルタイムの転送統計を表示する)
~]# rclone copy /path/to/dir/website.tar google-backup:/BACKUP/ -P
Transferred: 2.407M / 2.407 MBytes, 100%, 264.357 kBytes/s, ETA 0s
Transferred: 1 / 1, 100%
Elapsed time: 9.9s
確認。
~]# rclone ls google-backup:/BACKUP/
2524097 website.tar
新サーバーの DNS へ切り替えたのち、hook 付き certbot を実行して、renewal 設定を作成する。
1. TSIG 鍵の作成。
~]# tsig-keygen -a hmac-sha256 certbot-key > /var/named/certbot.key
~]# chown root:named /var/named/certbot.key
~]# chmod 640 /var/named/certbot.key
2. named.conf に TSIG 鍵を登録。
~]# vi /etc/named.conf
追記。
include "/var/named/certbot.key";
zone "wave440.com" {
type master;
file "wave440.com.db.wan";
update-policy {
grant certbot-key name _acme-challenge.wave440.com. txt;
};
allow-query { any; };
allow-transfer {
216.218.133.2;
2001:470:600::2;
};
notify yes;
};
設定反映。
~]# rndc reconfig
3. Certbot hook スクリプトを作成。
manual-auth-hook(TXT 追加)
~]# vi /usr/local/bin/certbot-auth.sh
#!/bin/bash
nsupdate -k /var/named/certbot.key << EOF
server 127.0.0.1
zone wave440.com.
update add _acme-challenge.wave440.com. 60 IN TXT "$CERTBOT_VALIDATION"
send
EOF
後に自動更新に失敗しました。/var/log/letsencrypt/letsencrypt.log を見てみると、下記のような記述がありました。
Hint: The Certificate Authority failed to verify the DNS TXT records created by the --manual-auth-hook. Ensure that this hook is functioning correctly and that it waits a sufficient duration of time for DNS propagation. Refer to "certbot --help manual" and the Certbot User Guide.
「BIND への反映・DNS 伝播の待機時間不足」のようだったので、下記を追加しました。
#!/bin/bash
nsupdate -k /var/named/certbot.key << EOF
server 127.0.0.1
zone wave440.com.
update add _acme-challenge.wave440.com. 60 IN TXT "$CERTBOT_VALIDATION"
send
EOF
# ローカル BIND (127.0.0.1) に TXT レコードが反映されるまでループ待機
# (最大 60 秒間、3秒おきにチェック)
MAX_RETRY=20
COUNT=0
echo "Waiting for DNS TXT record to be queryable..."
until dig +short TXT _acme-challenge.wave440.com @127.0.0.1 | grep -q "${CERTBOT_VALIDATION}"; do
sleep 3
COUNT=$((COUNT + 1))
if [ $COUNT -ge $MAX_RETRY ]; then
echo "ERROR: DNS TXT record propagation timed out."
exit 1
fi
done
echo "Local DNS updated successfully."
# セカンダリ DNS へのゾーン転送や外部伝播のための猶予時間
sleep 15
manual-cleanup-hook(TXT 削除)
~]# vi /usr/local/bin/certbot-cleanup.sh
#!/bin/bash
nsupdate -k /var/named/certbot.key << EOF
server 127.0.0.1
zone wave440.com.
update delete _acme-challenge.wave440.com. TXT
send
EOF
deploy-hook(更新後に httpd / Postfix / Dovecot を reload)
~]# vi /usr/local/bin/certbot-deploy.sh
#!/bin/bash
systemctl reload httpd
systemctl reload postfix
systemctl reload dovecot
権限。
chmod 700 /usr/local/bin/certbot-*.sh
4. 新サーバーの DNS で取得(DNS‑01 manual)
入力
~]# certbot certonly \
--manual \
--preferred-challenges dns \
--manual-auth-hook /usr/local/bin/certbot-auth.sh \
--manual-cleanup-hook /usr/local/bin/certbot-cleanup.sh \
--deploy-hook /usr/local/bin/certbot-deploy.sh \
-d '*.wave440.com' -d wave440.com \
--agree-tos \
--email xxxxx@wave440.com
・・・
・・・
What would you like to do?
- - - - - - - - - - - - - - - - - - - - - - - - - - - - - - - - - - - - - - - -
1: Keep the existing certificate for now
2: Renew & replace the certificate (may be subject to CA rate limits)
- - - - - - - - - - - - - - - - - - - - - - - - - - - - - - - - - - - - - - - -
Select the appropriate number [1-2] then [enter] (press 'c' to cancel): 2
Renewing an existing certificate for *.wave440.com and wave440.com
Successfully received certificate.
Certificate is saved at: /etc/letsencrypt/live/wave440.com/fullchain.pem
Key is saved at: /etc/letsencrypt/live/wave440.com/privkey.pem
・・・
・・・
systemd タイマー確認。
~]# systemctl list-timers
renewal 設定確認。
~]# cat /etc/letsencrypt/renewal/wave440.com.conf
deploy-hook 付きで実行しても、renewal 設定には renew_hook として保存されるようです。
renew_hook は古い互換用らしいので、手動で deploy_hook に変更編集しました。
rndc reload example.com
rndc: 'reload' failed: dynamic zone
このエラーは、ゾーンが allow-update または update-policy により動的更新(nsupdate)を許可しているため、手動編集 + reload が禁止されるという意味です。
動的ゾーンを一時的にフリーズ して編集 → thaw
rndc freeze example.com
vi /var/named/example.com.zone
rndc thaw example.com
--enablerepo を付けてインストールしたパッケージは、自動更新の dnf update では update されないので、--enablerepo を付けて更新するスクリプトを作成して、/etc/cron.weekly/ に置いています。
#!/bin/bash
dnf -y update --enablerepo=epel nkf ImageMagick ImageMagick-devel ffmpeg ffmpeg-devel snapd opendkim opendkim-tools vnstat
dnf -y update --enablerepo=crb libwebp-tools
/var/named/ 内に tmp-xxxxx という消えるべき一時ファイルが大量に蓄積されていくので、下記スクリプトを作成して、/etc/cron.daily/ に置いています。
1日前(24時間以上前)に作成・更新された tmp-* ファイルを削除します。
時間を指定しているのは、BIND がまさに今使っているかもしれないものを除外するためです。
#!/bin/bash
find /var/named/ -maxdepth 1 -name "tmp-*" -mtime +0 -type f -delete
ImageMagick をアップデートして、Imagick のビルド時に使った ImageMagick とバージョンがズレると「php -v」などでもタイトルの Warning がでます。Imagick を再ビルドしてバージョンを揃えます。
また、再インストール時、imagick を一時的に無効化しないと下記エラーがでます。
ERROR: Extension 'imagick' already loaded. Please unload it in your php.ini file prior to install or upgrade
php.ini 編集。
~]# vi /etc/php.ini
コメントアウト
;extension=imagick.so
再起動
~]# systemctl restart php-fpm
~]# systemctl restart httpd
再インストール
~]# pecl uninstall imagick
~]# pecl install imagick
imagick を再度有効にする。
~]# vi /etc/php.ini
削除
;extension=imagick.so
再起動
~]# systemctl restart php-fpm
~]# systemctl restart httpd